- Example
You can upload your own geography layer into the Geoscape ® system , i.e., zones, such as Census Regions, self-defined sales territories, marketing regions, etc., and both visualize them on maps and aggregate data to them for display and reporting.
Regions can be defined based on any geography level for which you are currently licensed. The Upload Geography feature can be accessed from all map modules, Marketscape™ Retail Target, and MediaTargete™ as well as MDx Reports-Create Your Own Report.
Prepare Upload File
As of August 20th, 2012 GIS is using 2010 census definitions for block groups and census tracts.
Note - For accurate results the file should not contain any duplicate geography values.
The upload file needs to have the geography defined in a manner the system will recognize. The following identifiers for the corresponding geography are required:
Geography |
Identifier |
Length / Type |
Format / Example |
State |
Two letter state code. |
2 / alpha |
AA / FL |
DMA |
Nielsen 3-character codes. Please use this document as a reference, List of DMAs Codes | 3 / numeric | NNN / 201 |
Congressional District |
The combined state 2 digit FIPS code plus the 2 digit Congressional District code. Please use this document as a reference, List of Congressional Districts Codes | 4 / numeric | SSCC/ 2004 |
Metro Area |
The combination of the Office of Management and Budget’s (OMB) Metropolitan Statistical Areas plus the Micropolitan Statistical Areas,List of Metro Area Codes | 5 / numeric | NNNNN / 23460 |
County |
The combined state 2 digit FIPS code plus the 3 digit county FIPS, List of County Codes | 5 / numeric | SSCCC / 01027 |
ZIP Code |
Format NNNNN, length=5 |
5 / numeric |
NNNNN / 33135 |
Census Tract |
The combined state 2 digit FIPS code plus the 3 digit county FIPS and the tract FIPS. |
11 / numeric |
SSCCCTTTTTT / 05007020100 |
Block Group |
The combined state 2 digit FIPS code plus the 3 digit county FIPS plus 6 digit tract FIPS code and the block group FIPS |
12 / numeric
|
SSCCCTTTTTTB / 20077991600 |
Census Block
|
The combined state 2 digit FIPS code plus the 3 digit county FIPS plus 6 digit tract FIPS code plus 1 digit block group FIPS and 3 digit census blocks FIPS |
15 / numeric
|
SSCCCTTTTTTBbbb / 200779616001005 |
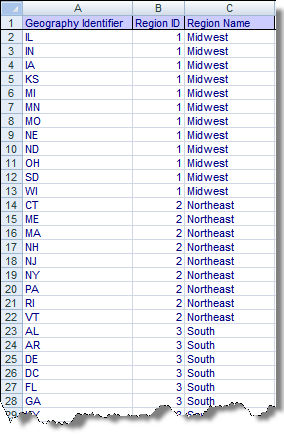
The file needs to contain the following:
Upload Data
Click Marketscape tab.
On the submenu click ![]() Upload Data icon and select Upload Geography The File
Processing Wizard displays.
Upload Data icon and select Upload Geography The File
Processing Wizard displays.
Click Browse. Navigate to find your file and click Open to return back to File Processing Wizard window.
Click Next. After you’ve uploaded the file the File Definition screen displays showing a preview of the file. For comma delimited files this screen allows you to define the delimiter used. For Excel files this screen allows you to select the sheet that contains the data to upload.
If the first row of your file contains column headings, select First Row contains Field Names check box
Click Next. Define Import Fields screen displays.
For the Geography ID Column drop down list select the column in your file that contains the geography identifier of the data you want to upload.
For the Geography ID Level drop down list select the type of geography data you're uploading.
For Region ID Column drop down list select the column in your file that contains the region IDs that unite your geographies.
For Region Name Column drop down list select the column in your file that contains the value you would want to see in reports and as labels.
Click Next.
If there are other users in your company the Share Uploaded Data screen displays. )Select user(s) to share your uploaded geography with (this is optional)
Click Next. The File Summary displays.
For the Project Name enter the name you want to see for this custom geography in the system.
Verify mapping is correct and then click Process.